Initial Setup
Initial Setup of the DCBuddy
Unboxing
Take it out of the box. Its pretty simple.
Using the optional mount bracket and cable retainer
The optional wall mount is shipped in two parts - a wall mount plate and the cable retainer clip. Before mounting the wall plate, attach the cable retainer by pushing it into the matched holes of the wall plate. Flip the wall plate over, and insert the two provided M3 stainless steel screws through the bottom of the wall plate.
The wall plate features four mounting holes designed for M3 or #4 screws. You can also use strong double sided adhesive or other means. Wall or stand hardware is not provided.
The DCBuddy features two dovetails on the bottom of the case, which allow the DCBuddy to slide down on the wall plate. Place the DCBuddy about 1/2 way up the wall plate, and slide it down to engage the wall plate.
Plugging in
Ensure the DCBuddy powers up by attaching a power supply to the input ports on the DC. Depending on your power supply, use one of the three provided inputs:
- Small loads, use the DC barrel jack. Do not exceed 5A total current when using the DC barrel jack input
- For the Meanwell OWA power supplies for 24V, use the DIN-4 power plug. Note the power plug has a sliding feature which locks into the port. To unplug, slide the plug backwards to disengage the lock - do not pull by the cord.
- For the Meanwell HLG power supply (32V), use the provided 10 pin Molex cable from the wire adapter box. The cable features a positive lock, which requires depressing to disengage.
- For DCBuddy Hub or DCBuddy Battery, use the provided Molex 10 pin cable.
After inserting the power plug into the DCBuddy, plug in the power supply to the wall or other GFCI protected receptacle used for your aquarium.
DCBuddy should power up with the Green power LED, the Amber port LEDs, and the OLED display displaying input voltage and port amperage. The status light will flash indicating no Home Assistant connection has been made.
Connecting to WiFi
Using the captive portal
DCBuddy, when new or when it cannot connect to a WiFi network, will start its own WiFi network with a “captive portal” allowing you to configure the WiFi network used.
- Network name: DCBuddy Fallback Hotspot
- Password: password
Once you have connected your phone or computer to this network, visit:
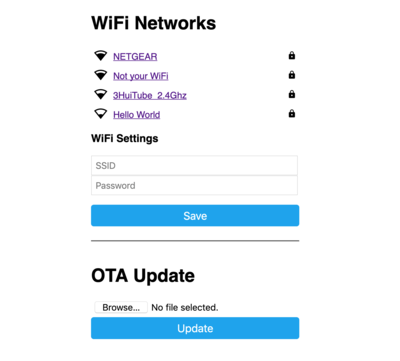
You should see a screen similar to the following, showing WiFi networks and allowing you to configure your network. Note that DCBuddy supports only 2.4GHz WiFi networks using WPA2/WPA3, and does not support 5GHz only or Enterprise Authentication networks.
Using the USB-C Port
You can provision WiFi or re-install firmware using the USB-C port at any time. Note that you will need a data USB-C cable - some USB-C cables are charge only and will not work. We suggest buying an Anker USB-C cable (either USB-A to USB-C or USB-C to USB-C). The cable needs to support USB 2.0 (3.0 is not required).
You will also need to use Chrome or Microsoft Edge to use the USB based web programming support.
Visit https://blueacro.github.io/reefvolt-dcbuddy/ for the configuration or reflashing page.
Connecting to Home Assistant
Home Assistant will generally automatically discover the DCBuddy if they are on the same network.
TODO: More docs
Accessing the DCBuddy local interface
DCBuddy runs a local web server which you can access locally without needing to use Home Assistant. By default, you can connect using the name:
If your network doesn’t use mDNS or the above doesn’t work, DCBuddy will display
its IP address on the OLED display on the bottom right. Connect to it by
entering http:// followed by the IP address in your browser.